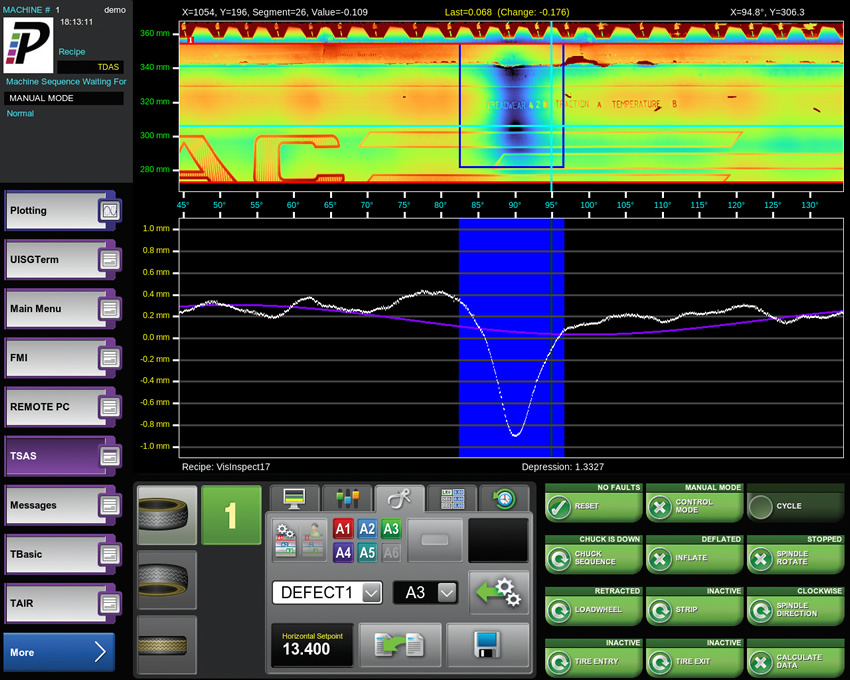
TSAS incorporates our patented Multi-Path Inspection (MPI) algorithm, complex mathematics, and 3D laser profile (aka ‘sheet-of-light’ or ‘line laser’) scanning to locate and accurately measure a tire’s geometry, including bulges, depressions, runout, wobble, and other customer-specific measurements.
The TSAS is available as a fully integrated TTOC6 controller option or as a standalone unit for replacement of your inadequate sidewall or RRO System.
For tread measurement, TSAS is equipped to use a line laser with a large field of view to measure the whole tread surface of a tire in one pass – shoulder to shoulder.
In addition to supporting a variety of 3D laser profile sensors from different manufacturers (e.g. LMI, Bytewise, Wenglor), the TSAS is also available with traditional 'spot lasers' which utilize our patented multi-path inspection software, and are significantly less expensive.
 Features Include:
 TSAS Software Suite
 Measure up to 32 harmonics for top, bottom, and center RRO in a single pass, saving cycle time and energy. When coupled with the Poling Group’s grinding option, TSAS feeds geometry data directly to the grinders for precise grinding of the tread, covering both the center and shoulder regions.
After grind, TSAS results can be used to determine how much material was removed in the process.
Our feature-rich toolset provides the ability to inspect and measure any region of the tire directly at the machine. Back in the office, analyze saved tire images using our Windows application to further enhance recipe setup and provide feedback to the tire-building process.
We're constantly improving this toolset to meet the changing demands of geometry testing. We also provide new features and custom tools upon request.
 TSAS Transport
 Our fully-automatic multi-axis transport precisely positions up to three geometry sensors.
The TSAS is available as a fully integrated TTOC6 controller option or as a standalone unit for replacement of your inadequate sidewall or RRO System.
For tread measurement, TSAS is equipped to use a line laser with a large field of view to measure the whole tread surface of a tire in one pass – shoulder to shoulder.
In addition to supporting a variety of 3D laser profile sensors from different manufacturers (e.g. LMI, Bytewise, Wenglor), the TSAS is also available with traditional 'spot lasers' which utilize our patented multi-path inspection software, and are significantly less expensive.
- Automatic detection of test regions (with manual override)
- Store thousands of tire images for later inspection
- Perform a complete geometry setup from a single screen
- Easy setup screen to configure sensor positioning that you can save directly to the TTOC machine controller
- Meets all geometry testing requirements of the major tire manufacturers
- Save geometry setup directly to your host. Don’t have a host? Check out our Final Finish Host (FFH) solution
 Measure up to 32 harmonics for top, bottom, and center RRO in a single pass, saving cycle time and energy. When coupled with the Poling Group’s grinding option, TSAS feeds geometry data directly to the grinders for precise grinding of the tread, covering both the center and shoulder regions.
After grind, TSAS results can be used to determine how much material was removed in the process.
Our feature-rich toolset provides the ability to inspect and measure any region of the tire directly at the machine. Back in the office, analyze saved tire images using our Windows application to further enhance recipe setup and provide feedback to the tire-building process.
We're constantly improving this toolset to meet the changing demands of geometry testing. We also provide new features and custom tools upon request.
 Our fully-automatic multi-axis transport precisely positions up to three geometry sensors.
- Positions two sidewall and one RRO laser
- Has both collision detection switches and dual-direction breakaways for maximum protection of your high investment lasers
- Uses customer-specified AB/Rockwell or Siemens servo motors and drives for all movement
- Separate 0.5m laser cable for final connection to laser for easy replacement of the most troublesome cable section
- Heavy-duty design fabricated for 20+ years of continuous production
 Geometry Laser Verification Wheel
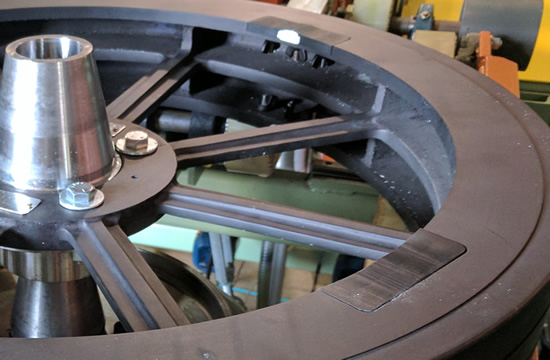
The Poling Group's new Tire Geometry Testing Verification Wheel provides the quickest way possible to verify your LRO/RRO geometry testing lasers. The verification wheel chucks directly on your testing machine's current rims (up to 19") and therefore requires no machine requalifying after verification.
Lateral Runout (LRO) : Both sidewall faces consist of four bulge/depression plates of varying heights. A ring on the outer 1" has a height variant of .15" for precision verification.
Radial Runout (RRO) : Three bands on the 'tread' side of the wheel each have a different height variant to verify RRO laser measurements.
- Non-inflatable wheel provides precise height variants for geometry laser verification
- Measures LRO, RRO, Phase Adjusted Lateral (Wobble) and Bulge/Depression
- Can be chucked on machine rims up to 19"
- Resume testing after verification with no need to requalify machine
- Bulge/depression inserts can be custom made to customer requirements, with typical height variants of 0.020" to 0.100"
- Verification wheel is fully supported by TSAS Software
- ISO 17025 Certified by external source at the request of Customers. ISO Certificate provided GVW
CTI, A POLING GROUP COMPANY
Founded in 1978, CTI has been a valuable resource for large industries. Since 2001, we've expanded the capabilities of Poling Group tire equipment, including uniformity and geometry testing machines.
©2025 Commercial Timesharing, Inc. All Rights Reserved
CTI is a Poling Group company.